How to Make Chocolate Curls
Chocolate curls are a great garnish for all sorts of desserts! This How to Make Chocolate Curls post shows you how to make perfect curls at home!
This post may contain paid links. For more information, please see our disclosure policy.
 Have you ever wondered how bakeries and restaurants make their desserts look so amazing? It’s actually quite simple. The secret is to always top your desserts with a fancy garnish. Garnishes often don’t take very long to make, and they’ll transform your plain desserts into something that looks like it came from a bakery! Today’s post describes a simple technique for making amazing chocolate curls to use on top of your desserts. Heck, these chocolate curls look so awesome that you may just want to serve a plate of these by themselves for an after dinner treat! And you probably already have the necessarily tools to make these curls right in your kitchen.
 In order to make professional looking chocolate curls, you’ll need to use the back of a cookie sheet or jelly-roll pan. Yup, the back of the pan. And the key here is that the pan needs to be clean and as flat as possible. If your pans are beat up and warped, then it might be time to treat yourself to a new baking sheet. You gotta be prepared for holiday baking, right?? Aside from a small metal bowl and a saucepan for melting the chocolate, the only other tool you’ll need is something with a stiff plastic edge. I’ve actually found that the 99¢ plastic paint scrapers from the hardware store are ideal for this job. (I keep one of these plastic scrapers in my baking drawer in the kitchen…and it’s marked “Baking” so that I don’t accidentally use it to scrape paint.) Plus, scraping chocolate curls is way more fun than scraping paint off an old wall!
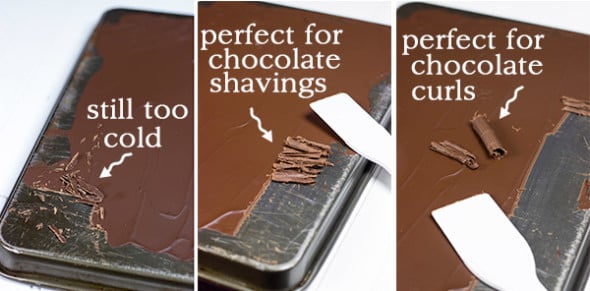 As the picture above shows, you’ll need to let the chocolate warm back up at room temperature before you can create curls. In the first picture, the chocolate was still too cold, and so it just broke into pieces as I tried to scrape it. In the second picture, the chocolate was warmer, but still too cold for curls. (It was the perfect temperature for making chocolate shavings, though.) Finally, in the third picture, the chocolate has warmed up to the perfect temperature. To make different shapes and sizes of curls, just experiment with the scraper. Scraping arcs or “s-shapes” in the chocolate will produce unique and fun-shaped curls.
One last tip is to store the finished curls in the refrigerator once they’re made. After all, they are chocolate, and they can melt when you touch them. So the solution to this is just to store them in a plastic container in the fridge until you’re ready to use them. You’ll be surprised at how easy it is to make these chocolate curls, and your friends and neighbors will be surprised at how awesome your desserts look when piled high with curls!
Looking for a fun dessert to go along with these chocolate curls? Try this Triple Chocolate Cheesecake with Oreo Crust! (It’s one of my all-time favorite desserts.)

How to Make Chocolate Curls
Ingredients
- 3 ounces chocolate any flavor of chocolate works, coarsely chopped
Instructions
- Place a clean, flat sheet pan in a 200°F oven until warm.
- Meanwhile, fill a medium saucepan with about 1" of water. Put chocolate in a small metal bowl and place bowl on top of saucepan. Heat over low heat until chocolate begins to melt, stirring frequently. Once chocolate is fully melted and smooth, remove the bowl from the saucepan.
- Remove sheet pan from oven and pour the chocolate onto the back of the pan.
- Use an offset spatula to spread the melted chocolate out as smooth as possible across the back of the pan.
- Place the pan in the freezer for 3-4 minutes or until chocolate is hard.
- Remove pan from freezer and let sit at room temperature for 2-3 minutes.
- Using the flat edge of a plastic scraper (see post), carefully scrape the chocolate from the pan in one continuous motion. (Note: If the chocolate breaks rather than curls, it is still too cold. Wait another 1-2 minutes and try again.)
- To create various sizes and shapes of curls, scrape arcs or "s-shapes" in the chocolate on the back of the pan.
- Store chocolate curls in a container in the refrigerator until ready to use.
Those look much better than the ones I make with my vegetable peeler. 😉
Hehe…I used to do the vegetable peeler trick, too. But I agree these look so much better! (And really not that hard at all.)
This is SO happening!! I can see myself upgrading my next layer cake to the next level with some gorgeous curls. I’ve always been intimidated by them but u make it look so easy. Thank you for this!! Pinned!
Thanks so much!! The curls really are easy to make, too!